Sunday, September 30, 2012

Vault Suit 101, Episode 6: That Blasted Pip-Boy 3000


PAX is long over, and I STILL haven't finished the chronicle of finishing up my Vault 101 costume...  But fear not, weary blog-reader!  This is the final installment of the construction phase: the completion of my Pip-Boy 3000.  Unfortunately, I was so busy building the damned thing, I forgot to take a ton of pictures.  I'll do the best I can to fill in the gaps, though.  Let's get started.


The last time I showed you the progress of my Pip-Boy, it was in pretty sad shape.  I hadn't even finished cutting out all of the pieces!  It was a pretty hectic week, that's for sure.  I did get all of the pieces cut out eventually, but before I could put them all together, I needed some sweet green LED action.


Purdy, ain't it?  No?  Well, you'd be right about that.  This was the first time I'd ever really wired LEDs into anything.  I took the wires from an old game controller I'd taken apart a long time ago and separated them out.  After I wired it all together, I positioned the LEDs about where I wanted them, and then glued the wires down to the inside so they wouldn't wiggle all around and come lose.  The tape was just there to hold everything in place while the glue dried.  This is something I plan to experiment around with more in the future.  Maybe, you know, even learn the "right way" to do it.

Once I was sure the lights worked, I started gluing all of the parts together.  It looked a little something like this:


Again, the green stuff is dry floral foam, the gray and red bits are kid's craft foam, and the cylinder began its life as a Pringles can that I reinforced with some paper mache.  I filled in the cracks with some wood filler I picked up at the hardware store (mixed with a little water ... it was a bit too thick otherwise), and I put the two halves together with some little hinges, also picked up from the hardware store.  Keeping it closed, though...  Well, that's a story for later.

For the screen image, I took a screenshot of the status screen of the Pip-Boy in game, resized and brightened it up a little in Photoshop, and printed it out.  I cut out all of the status bars with my trusty X-Act knife and scored some of the lines so the light would shine through brighter.  Oh, I also printed out the little gauge for the Geiger counter.  I also put some screws in some key places, just to finish up the look a bit.

Annnd ... this is the part where I forgot to take pictures.  The painting part.  After it was all put together, I put four or five coats of gesso over the whole thing.  That filled in a lot of the foam texture and gave me a good, solid layer to sand.  And holy shit, did I sand.  I used a fairly fine grain sandpaper (240), paying particularly close attention to the areas that would naturally see the most wear and the sharpest lines (like around the screen).

Then it was time for paint!  For the base coat, I painted the whole thing black with matte acrylic paint.  For the second coat, I dry brushed the whole thing with a dark olive green, making sure to let the black show through in some of the deep, dirty crevasses.  Once that coat dried, I "scratched it up" with some steel colored dry brushing on the corners and high wear-and-tear areas.  Once it was done, it looked just like this:


A close up of some of the details.


Wearing it!  It ended up being a little less bulky than I had originally thought.

So there you have it, a Pip-Boy 3000 that looks like it came straight from the D.C. Wasteland.  Someday, I'd like to build one that actually kind of works, but that's way beyond my skill level at this point.  Speaking of it working, I did mention that it lit up, right?

Picture taken on the showroom floor at PAX, courtesy of my awesome friend Will.

And that's it for the construction part of this project.  For now.  In my next entry, I'll talk about what I learned from this build and maybe even put up some long overdue pictures from PAX 2012 itself!

Wednesday, September 5, 2012

Vault Suit 101, Episode 5: The Bomb


Well, PAX is over.  Before I get into how completely awesome it was, I have a couple more things to show: the first being the construction of my mini nuke bag!  It ended up being one of the most noticed and liked things about my whole costume, so I think it deserves its own entry.


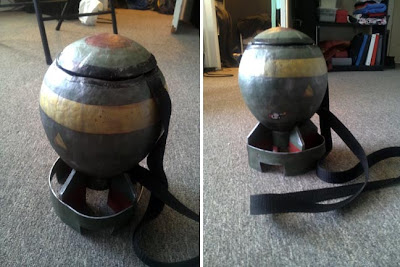
In my previous post, I showed what I had done so far.  The body of the bomb itself is made out of several layers of paper mache which I molded over a balloon, and the bottom ring I made by rolling out a flat sheet of Crayola Model Magic (kind of like Play-Doh, only much lighter and less sticky), cutting a rectangle out of it, and forming that into a cylinder.  Once the cylinder was dry, I cut at an angle around the inside of one end with an X-Acto knife so it fit around the bottom of the balloon shape a little better and glued them together.


These are the fins before I cut them out of the craft foam.  I used the thicker foam (it's maybe a quarter of an inch thick) so the whole bottom would be more stable.  Once I cut these pieces out, I shaped one of them to fit the bottom of the bomb and used it as a template for the others, then glued them on, like so:


After they dried, I thinned some Elmer's ProBond wood filler with a little water (just a little, otherwise it would have been too soupy) and filled the gaps around the sides where the pieces connected.  Not only did that fill in the cracks, but it added a bit more stability.

After that dried, I sanded it smooth and cut out the outside ring that goes around the bottom of the fins.  The sheet of thinner foam I used wasn't wide enough to go all the way around, so I had to do it in two pieces.  That ended up working out okay, though.  I just painted the glue seams to look like welds in the end.  This is what it looked like at that point:


Annnnd ... more drying.  Then it was time for painting!  I refreshed my memory by looking up images of mini nukes from the game and gave it a few coats of paint.  When the paint was all dry, I used a compass to draw a circle around the end where I was going to cut it open.  This is what it looked like after I cut it open and pulled the now deflated balloon out:

As it turns out, grocery ads are better for more than just coupons.

Obviously, I wasn't going to just leave the inside bare like that, and I needed some sort of hinge to keep the lit attached and able to easily open and close.  I bought some small cabinet hinges at the hardware store for that purpose and a remnant of Ultra Cuddle fabric at Jo-Ann's for the lining.  

I started with the lid.  Since the paper mache wasn't thick enough to actually screw the hinge on, I put it on with some super glue.  While the glue was drying, I punched some small holes in the body of the lid where the screw holes in the hinge were, threaded some wire through, twisted the ends together to hold it in place, and glued them down.  I covered it all up with a piece of the Ultra Cuddle fabric, which I glued in place with some craft glue, trimmed off, and then I finished the edges with a combination of super glue and electrical tape.

I know, that all sounds like some kind of nightmare, but it turned out pretty well in the end.


Once the lid was finished, I repeated the process with the body, first making sure the piece I had cut off for the lid lined up with where I had initially cut it from and then gluing/sewing the strap where I wanted it.  I attached the hinge, lined it, and finished off the edge just like I had done before.

Finally, the construction was complete!  All I had to do was paint it to look a little more like it had spent some time in the Capital Waste, and it was all done.

The quality of this photo is, again, terrible.  I'll try to take some better pictures soon...

And that's that!  In the next episode, I'll show some WIP pictures of my Pip-Boy 3000 and some final pictures of the whole costume!

Friday, August 24, 2012

Vault Suit 101, Episode 4: Crunch Time, AKA Waiting for Shit to Dry


One week.  One week until PAX.  Yep.  It's crunch time.  I know I said I'd update "soon" sometime last week, but I feel like I've been really busy.  Busy spinning my wheels, mostly...  I was putting off certain things until I acquired more supplies and putting off other things to work on this new great idea I had, which turned out to be more time consuming than I'd hoped.  And what am I doing now?  Waiting for shit to dry.  I knew that was going to be my biggest time sink, and here I am, glaring at paint and glue and clay ... waiting for shit to dry.

But there's good news, too!  Things are starting to get done.  And by done, I mean, "These things are finished."  Let's start there, shall we?


Remember those Nuka Cola caps I had been painting?  Well, it feels pretty good to have all of those done, and I'm really pleased with the way they turned out.  So pleased, in fact, that I'm thinking about making a bunch more of them and adding them to my Etsy store...?  Maybe?  We'll see about that.  Anyway, on with the process...


Here they are, all shiny and new looking!  All 35 of them.  They looked a little too new, though.  So I decided to experiment a little bit and splatter them with coffee.  Yes, coffee.


They're still wet here, and not quite ... splattered enough, but I figured what works for aging paper might just look like old stains or light rust on a bottle cap.  When they dried, I wasn't disappointed!  And don't worry, I didn't waste a fresh cup on staining some bottle caps.  I used the old sludge coffee at the bottom of my French press for that business.  Ew.

Even after staining them with coffee, I knew I wasn't done.  For one, the dried coffee was just going to rub off, and they were still too shiny.  I just so happened to have a can of matte acrylic clear coat laying around that solved both of those problems!  A little shiny silver dry brushing, and I had my finished product:


That's a terrible picture.  Let's try that again.


And there you have it!  Caps are finished!  I feel like they kind of took forever, but I think they were well worth the effort.  

Another thing I managed to track down was a pair of black gloves.  It being the middle of August, I was almost afraid I'd be out of luck.  Sure enough, though, apparently August is the time to start planning for winter...?  I found a pair of plain black gloves, whacked the fingers off, and attached this ... thing.


This goes next to the good ol' Pip-Boy 3000.  Once I get it finished, that is.  Ah, now I'm getting ahead of myself.  Pip-Boy is definitely not on the list of finished things.  But this is!


Well, mostly.  But ... hell yeah!  That's the most important part:  The Vault 101 jumpsuit itself!  It's still a bit baggy in some places, and if I could do it all over again, I'd use a stretchier material.  It's probably going to get some weathering before it's totally done, but there it is.  Complete with knee and elbow pads.


Now for the less done things.  I guess I should start with the sad progress of the Pip-Boy.


Doesn't look that different, eh?  I guess I've just been too busy working on everything else to really get a lot done on this guy.  But there's some progress.  Mostly ordering the steps in my head, trying to figure out what needs to be done now to do the next things that need done.  Like painting the little bits.  Oh, and waiting for shit to dry...

Speaking of waiting for shit to dry, I had this brilliant idea.  Sort of a way to kill two birds with one stone.  See, I was sort of lamenting the fact that I wasn't really going to have time to build a weapon to carry around.  I'd feel pretty bad ass walking around with a sweet Gauss Rifle, but that would take a hell of a lot more time than I would have to build it.  I also needed something to carry stuff around in.  My jumpsuit has pockets, but I'm going to want to bring in more stuff than I can carry in a couple of pockets.

When I went to GeekGirlCon a couple of weeks ago, I sat in on a cosplay/costuming panel hosted by the wonderful ladies at Crafters in Disguise, and they made a case for being creative when it comes to bags and things of that sort.  And that's when the idea hit me.

Wouldn't it be great if I made a "bag" out of a mini nuke?!

Yes.  Yes it would.  And here's the progress so far:


I know, I know, it doesn't look like much so far and ohmygodIonlyhaveaweektofinish(!?!), but this guy is gonna be super simple.  Just, you know, waiting for shit to dry.

The body is made of several layers of paper mache, which I built over a balloon.  A few coats of gesso later, and it's ready to be sanded so it looks a little less like little bits of paper.  The part of the ring that goes around the bottom is made out of Crayola Model Magic, another sweet suggestion from the CiD ladies.  I've always seen it at work but never used it before.  I gotta say, I'm a believer!  It's super easy to work with and extra light.  All I have left to do is cut some shapes out of craft foam, glue it all together, paint it, line it, and attach the strap!  Wheee!

And with that, I'll leave you with a picture of the chaos that my normally slightly-less-than-orderly workspace has become.  Six more days.  Wish me luck!


Monday, August 13, 2012

Vault Suit 101, Episode Three: Paint!


Yep, I've been doing some painting.  For projects like this, I like to use Testors model paint.  Especially on the hard plastic bits.  It's just a personal preference really.  I like the way it dry brushes, and the metalic colors feel like they look a bit more ... metallic.  Also, I have a ton of it laying around because I used to build a lot of models, which always helps.

For this update, I started working on a new and exciting accessory, did some more construction on the Pip-Boy body, and finished up the elbow/knee pads.  Let's start there!


These look a little more like they've been out in the wasteland now, don't they?  After the solid black coat, I went over most of the surface very lightly with a dark olive drab, paying special attention to the ridges and edges (parts of the pad that would get the most natural wear).  After that dried, I dry brushed on some steel color, once again mostly just on the protruding bits.  Oh, and remember how I said those scratches and dents would come in handy later...?


Oh yeah, those look nice!  All that's left is to attach them to the suit itself, and they're good to go.


Now to show off that new accessory I'm working on and explain how I'm approaching it.  Here they are, in varying stages of completion:


Nuka Cola bottle caps!  How else would I be able to trade for goods in the PAX Prime wasteland?  (if I can manage to trade a few of these for actual goods, I'll be thrilled ... lol)  The logo looks a bit more hand painted than I'd like, but at least I don't have to draw it on each and every cap.  I made a stamp!


The red part is thick craft foam.  I had originally hoped I could carve the stamp itself out of the foam, but it proved to be a little bit too squishy.  Instead, I painted over one side of the foam with several thick coats of gesso, let them dry, sanded them smooth, transferred the design onto that, and carved it out with the tip of a brand new X-Acto knife blade.  It actually worked out pretty well!  Except the paint I'm using doesn't stamp very cleanly, so I have to go back over the logo with a paintbrush and fill it in...  It'll probably look a little better once I weather them a little bit.


And, lastly, a little update on the Pip-Boy progress.  I had a pretty busy weekend, so I didn't get too terribly much done, but I did give it a bit more shape.


I roughed out the hole for the screen, and added a little turny gear!  While I was busy this weekend, I learned a thing or two about LEDs, and that gave me an idea for what I'm going to do for the screen.  Nothing too fancy, but at least it'll light up!  Er ... hopefully.  I have the next couple of days off, so expect another update soon.  Until next time!


Thursday, August 9, 2012

Vault Suit 101, Episode Two: Prop Building WIP


Last night, I went to bed covered in green foam dust and reeking of paint thinner, but the progress made it all worth while.  I got a decent enough start on my Pip-Boy 3000 to not be afraid of it anymore (seriously, see the concept art up above?), and some of the little accessories are pretty much done.  Let's start with those!


This odd looking thing buttons onto the jumpsuit over the shoulder.  I decided to make it button on so I could, you know, wash the actual jumpsuit if the need arises.  Which it probably will, because I'm a klutz.  Anyway...  That is also what the carpet in my apartment look like, in case you were curious.


I decided to go with the "found object" approach for a lot of the accessory pieces to this costume, something I discovered worked brilliantly for the Borg costume I make with some friends a few years ago.  For instance, this front piece is made from a cell phone back, a disassembled syrup pump, and some random screws and pieces of plastic.  The cord is made from a chopped off cord from a keyboard wrapped with a thin strip of craft foam (that soft, squishy stuff in the kid's craft isle).  Never forget:  It's amazing what slapping a bunch of random stuff together, painting it black, and adding a little steel-colored dry brushing to can do.


These are the knee/elbow pads that will eventually be sewn on to the suit itself.  I was lucky enough to find a pair of catcher's shin guards at a thrift store to scavenge these from.  Initially, they were that awful bright orange, but ... once again ... a nice coat of black paint will solve all of your mismatched color woes.  And the nice thing about finding a used set of sports gear?  It's already banged up a bit.  You can't really tell in this horrible, low res photo, but these babies are scratched to hell!  They'll look really nice once the dry brushing is done.

And now for the thing I dreaded building the most:  the Pip-Boy 3000.  It's still in its very infant stages, so I don't have a lot to show.  It being the most complicated piece, though, I thought I would go into he most detail.


This is the base!  I made it out of a Pringles can and covered it with a piece of card stock!  Did I mention I'm doing this on a budget...?  I cut a long wedge out of the cylinder and flipped it around to give it a better fitting shape, which is why I covered it in card stock: to hold it all together.  I knew I was going to have to cut it in half, though.  It needed to be a little stronger...


...so I covered it in about eight layers of paper mache!  Grocery ads are good for more than just planning shopping trips, as it turns out.  It fits a little snug on my forearm, but that's fine.  It needs to be sawed in half and worked on a lot more before it's done.


This is the first step of building onto the base.  I've discovered that those green, dry floral foam blocks are GREAT for sculpting props on the cheap.  It's a lot grainier than craft foam, which makes the painting process go a lot smoother in the end.  It also cuts like warm butter with an X-Acto knife (or any other kind of razor blade), and it nearly melts into shape with 120 grit sandpaper.  I could go on for days about this stuff!  I love it!  The only downside is the gritty dust it leaves behind.  If you can, I'd recommend working with it outside, probably while wearing a dust mask.  All of it is being held together with just a basic white craft glue.


And this is the start of the main body!  Like I said, in its infant stages, but it's far enough along that I feel more confident about the whole process.  I'm still puzzling out how to do the screen and some of the other finer details, but those will come from just experimenting and trying things.  Oh, and one more thing for today...


This is what the collar looks like with the numbers sewn on.  And my rad sort-of-new haircut!

More updates in a couple of days.  Right now, I'm waiting patiently for glue and paint to dry before moving too far forward.  Ah, the trials and tribulations of crafting...

Wednesday, August 8, 2012

Vault Suit 101, Episode One: The Story So Far


About three years ago, I got it into my head that I needed a Vault 101 jumpsuit.  You see, by that time, I'd already put well over a hundred hours into Fallout 3, and it's still one of my favorite games of all time.  Ever.  Seriously.

If you don't know what in the hell I'm talking about,  Fallout 3 is a video game released in 2008 by Bethesda Game Studios.  It's an action role-playing style game set in the wasteland that was once Washington DC, 200 years after a nuclear war between the United States and China got a little ... out of hand.  The main character starts the game in Vault 101, where (you believe) your family has lived for generations, safely tucked away from the mayhem on the surface.  You soon find out that is not the case, however, and are forced to escape to the surface to search for your father and brave all sorts of dangers and moral conundrums.

Look it up on YouTube if you're interested.  And you should be.

In any case ... I started making the jumpsuit for Halloween that year and never finished it.  There was a lot of prop building involved, I didn't have the time or money to do the costume justice before Halloween, and (probably the more important factor) I didn't have anyplace cool to wear it.  I lived in Kansas City at the time!  There weren't any conventions closer than Chicago, and if i wore it out on the town on Halloween, I'd be answering the "What the hell are you supposed to be?" question all night.  So I finished all of the sewing and put it in the closet.

Then, my friends, I moved to Seattle and that all changed.  We've got Emerald City Comicon, GeekGirlCon, and (as far as I'm concerned) the Holy Grail of gaming conventions: Penny Arcade Expo.  GeekGirlCon sort of crept up on me.  I had to be reminded a few days ago that it was coming up this weekend.  And I didn't get to go to PAX last year. I BARELY got a single day pass to go this year...

But I'll be damned if I don't go that one fateful day in my Vault 101 jumpsuit.

So, a few days ago, I pulled the ol' jumpsuit out of the closet, made a few adjustments, and now I've started working on it in earnest.  I have three weeks to finish it for real.  I've experimented with some options for sculpting props on a budget and collected almost all of the necessary materials.  It's go time!

I'll leave you with the pictures I took when I first started putting the actual jumpsuit together.  I've come a long way, but I still have quite a lot of work to do...

The front and back pieces, before sewing them together at the shoulder.

After sewing them at the shoulder, complete with zipper and flap!

Oooh, now it has sleeves and a collar (which I may or may not have totally improvised).

And here's what the whole thing looked like before I sewed the side seams together.

I'd done more work to it since I took these pictures, like added some elastic around the middle and sewed the numbers on the back and collar.  Like I said, still have a lot of work to do.  Wish me luck, and check back tomorrow for some pictures of my progress!

Wednesday, June 27, 2012

Cleaning House

It's funny how I leave something in an unfinished state, only to come back to it later and think, "Ugh, that looks awful!  What on Earth was I thinking?!"

On that note, it looks like I'm going to be doing some house cleaning around here.  If you've stumbled upon this mess in its "in progress" state of flux, I apologize and promise good things to come!