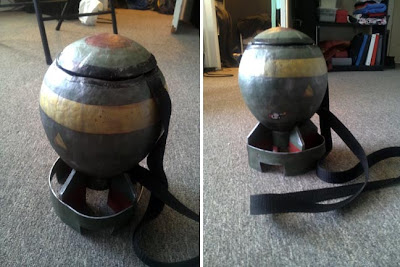
Well, PAX is over. Before I get into how completely awesome it was, I have a couple more things to show: the first being the construction of my mini nuke bag! It ended up being one of the most noticed and liked things about my whole costume, so I think it deserves its own entry.
In my previous post, I showed what I had done so far. The body of the bomb itself is made out of several layers of paper mache which I molded over a balloon, and the bottom ring I made by rolling out a flat sheet of Crayola Model Magic (kind of like Play-Doh, only much lighter and less sticky), cutting a rectangle out of it, and forming that into a cylinder. Once the cylinder was dry, I cut at an angle around the inside of one end with an X-Acto knife so it fit around the bottom of the balloon shape a little better and glued them together.
These are the fins before I cut them out of the craft foam. I used the thicker foam (it's maybe a quarter of an inch thick) so the whole bottom would be more stable. Once I cut these pieces out, I shaped one of them to fit the bottom of the bomb and used it as a template for the others, then glued them on, like so:
After they dried, I thinned some Elmer's ProBond wood filler with a little water (just a little, otherwise it would have been too soupy) and filled the gaps around the sides where the pieces connected. Not only did that fill in the cracks, but it added a bit more stability.
After that dried, I sanded it smooth and cut out the outside ring that goes around the bottom of the fins. The sheet of thinner foam I used wasn't wide enough to go all the way around, so I had to do it in two pieces. That ended up working out okay, though. I just painted the glue seams to look like welds in the end. This is what it looked like at that point:
Annnnd ... more drying. Then it was time for painting! I refreshed my memory by looking up images of mini nukes from the game and gave it a few coats of paint. When the paint was all dry, I used a compass to draw a circle around the end where I was going to cut it open. This is what it looked like after I cut it open and pulled the now deflated balloon out:
As it turns out, grocery ads are better for more than just coupons.
Obviously, I wasn't going to just leave the inside bare like that, and I needed some sort of hinge to keep the lit attached and able to easily open and close. I bought some small cabinet hinges at the hardware store for that purpose and a remnant of Ultra Cuddle fabric at Jo-Ann's for the lining.
I started with the lid. Since the paper mache wasn't thick enough to actually screw the hinge on, I put it on with some super glue. While the glue was drying, I punched some small holes in the body of the lid where the screw holes in the hinge were, threaded some wire through, twisted the ends together to hold it in place, and glued them down. I covered it all up with a piece of the Ultra Cuddle fabric, which I glued in place with some craft glue, trimmed off, and then I finished the edges with a combination of super glue and electrical tape.
I know, that all sounds like some kind of nightmare, but it turned out pretty well in the end.
Once the lid was finished, I repeated the process with the body, first making sure the piece I had cut off for the lid lined up with where I had initially cut it from and then gluing/sewing the strap where I wanted it. I attached the hinge, lined it, and finished off the edge just like I had done before.
Finally, the construction was complete! All I had to do was paint it to look a little more like it had spent some time in the Capital Waste, and it was all done.
The quality of this photo is, again, terrible. I'll try to take some better pictures soon...
And that's that! In the next episode, I'll show some WIP pictures of my Pip-Boy 3000 and some final pictures of the whole costume!


I think you did a great job on this. My boyfriend wants one now.
ReplyDelete