Sunday, September 30, 2012

Vault Suit 101, Episode 6: That Blasted Pip-Boy 3000


PAX is long over, and I STILL haven't finished the chronicle of finishing up my Vault 101 costume...  But fear not, weary blog-reader!  This is the final installment of the construction phase: the completion of my Pip-Boy 3000.  Unfortunately, I was so busy building the damned thing, I forgot to take a ton of pictures.  I'll do the best I can to fill in the gaps, though.  Let's get started.


The last time I showed you the progress of my Pip-Boy, it was in pretty sad shape.  I hadn't even finished cutting out all of the pieces!  It was a pretty hectic week, that's for sure.  I did get all of the pieces cut out eventually, but before I could put them all together, I needed some sweet green LED action.


Purdy, ain't it?  No?  Well, you'd be right about that.  This was the first time I'd ever really wired LEDs into anything.  I took the wires from an old game controller I'd taken apart a long time ago and separated them out.  After I wired it all together, I positioned the LEDs about where I wanted them, and then glued the wires down to the inside so they wouldn't wiggle all around and come lose.  The tape was just there to hold everything in place while the glue dried.  This is something I plan to experiment around with more in the future.  Maybe, you know, even learn the "right way" to do it.

Once I was sure the lights worked, I started gluing all of the parts together.  It looked a little something like this:


Again, the green stuff is dry floral foam, the gray and red bits are kid's craft foam, and the cylinder began its life as a Pringles can that I reinforced with some paper mache.  I filled in the cracks with some wood filler I picked up at the hardware store (mixed with a little water ... it was a bit too thick otherwise), and I put the two halves together with some little hinges, also picked up from the hardware store.  Keeping it closed, though...  Well, that's a story for later.

For the screen image, I took a screenshot of the status screen of the Pip-Boy in game, resized and brightened it up a little in Photoshop, and printed it out.  I cut out all of the status bars with my trusty X-Act knife and scored some of the lines so the light would shine through brighter.  Oh, I also printed out the little gauge for the Geiger counter.  I also put some screws in some key places, just to finish up the look a bit.

Annnd ... this is the part where I forgot to take pictures.  The painting part.  After it was all put together, I put four or five coats of gesso over the whole thing.  That filled in a lot of the foam texture and gave me a good, solid layer to sand.  And holy shit, did I sand.  I used a fairly fine grain sandpaper (240), paying particularly close attention to the areas that would naturally see the most wear and the sharpest lines (like around the screen).

Then it was time for paint!  For the base coat, I painted the whole thing black with matte acrylic paint.  For the second coat, I dry brushed the whole thing with a dark olive green, making sure to let the black show through in some of the deep, dirty crevasses.  Once that coat dried, I "scratched it up" with some steel colored dry brushing on the corners and high wear-and-tear areas.  Once it was done, it looked just like this:


A close up of some of the details.


Wearing it!  It ended up being a little less bulky than I had originally thought.

So there you have it, a Pip-Boy 3000 that looks like it came straight from the D.C. Wasteland.  Someday, I'd like to build one that actually kind of works, but that's way beyond my skill level at this point.  Speaking of it working, I did mention that it lit up, right?

Picture taken on the showroom floor at PAX, courtesy of my awesome friend Will.

And that's it for the construction part of this project.  For now.  In my next entry, I'll talk about what I learned from this build and maybe even put up some long overdue pictures from PAX 2012 itself!

Wednesday, September 5, 2012

Vault Suit 101, Episode 5: The Bomb


Well, PAX is over.  Before I get into how completely awesome it was, I have a couple more things to show: the first being the construction of my mini nuke bag!  It ended up being one of the most noticed and liked things about my whole costume, so I think it deserves its own entry.


In my previous post, I showed what I had done so far.  The body of the bomb itself is made out of several layers of paper mache which I molded over a balloon, and the bottom ring I made by rolling out a flat sheet of Crayola Model Magic (kind of like Play-Doh, only much lighter and less sticky), cutting a rectangle out of it, and forming that into a cylinder.  Once the cylinder was dry, I cut at an angle around the inside of one end with an X-Acto knife so it fit around the bottom of the balloon shape a little better and glued them together.


These are the fins before I cut them out of the craft foam.  I used the thicker foam (it's maybe a quarter of an inch thick) so the whole bottom would be more stable.  Once I cut these pieces out, I shaped one of them to fit the bottom of the bomb and used it as a template for the others, then glued them on, like so:


After they dried, I thinned some Elmer's ProBond wood filler with a little water (just a little, otherwise it would have been too soupy) and filled the gaps around the sides where the pieces connected.  Not only did that fill in the cracks, but it added a bit more stability.

After that dried, I sanded it smooth and cut out the outside ring that goes around the bottom of the fins.  The sheet of thinner foam I used wasn't wide enough to go all the way around, so I had to do it in two pieces.  That ended up working out okay, though.  I just painted the glue seams to look like welds in the end.  This is what it looked like at that point:


Annnnd ... more drying.  Then it was time for painting!  I refreshed my memory by looking up images of mini nukes from the game and gave it a few coats of paint.  When the paint was all dry, I used a compass to draw a circle around the end where I was going to cut it open.  This is what it looked like after I cut it open and pulled the now deflated balloon out:

As it turns out, grocery ads are better for more than just coupons.

Obviously, I wasn't going to just leave the inside bare like that, and I needed some sort of hinge to keep the lit attached and able to easily open and close.  I bought some small cabinet hinges at the hardware store for that purpose and a remnant of Ultra Cuddle fabric at Jo-Ann's for the lining.  

I started with the lid.  Since the paper mache wasn't thick enough to actually screw the hinge on, I put it on with some super glue.  While the glue was drying, I punched some small holes in the body of the lid where the screw holes in the hinge were, threaded some wire through, twisted the ends together to hold it in place, and glued them down.  I covered it all up with a piece of the Ultra Cuddle fabric, which I glued in place with some craft glue, trimmed off, and then I finished the edges with a combination of super glue and electrical tape.

I know, that all sounds like some kind of nightmare, but it turned out pretty well in the end.


Once the lid was finished, I repeated the process with the body, first making sure the piece I had cut off for the lid lined up with where I had initially cut it from and then gluing/sewing the strap where I wanted it.  I attached the hinge, lined it, and finished off the edge just like I had done before.

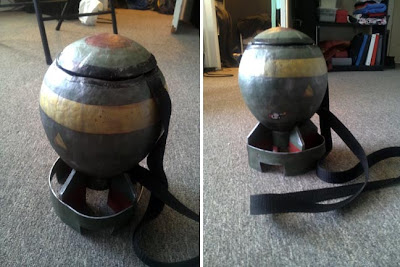
Finally, the construction was complete!  All I had to do was paint it to look a little more like it had spent some time in the Capital Waste, and it was all done.

The quality of this photo is, again, terrible.  I'll try to take some better pictures soon...

And that's that!  In the next episode, I'll show some WIP pictures of my Pip-Boy 3000 and some final pictures of the whole costume!